Paint Table Update

Well, so much for a week off. I managed to complete the base on the Zombie Dragon which has sat around since I painted it hurriedly on Boxing Day.

Last night, we had an Agent Carter epic TV watching catch up session so I painted while it was on. I did manage to more or less finish a German 251/10 command half-track. Although the vehicle is finished, it is missing the gunner holding the Pak36 and the rear gunner with an MG42.

Here’s the mobile phone pics from the paint table.

Vampire Lord on Zombie Dragon


Command Half-track 251/10

On this 3rd photo, I brought down the original Half-track I’d painted. I can’t decide which type of numerals look best. The plain black or the white edged black. 😦

Oh, and excuse the half painted Saurus warriors in the background. πŸ™‚


February already…

It seems a long time since I had chance to update this page. Apologies.

Anyway, there’s quite a few models I’ve had chance to take photos of today and upload. A real mix of Fantasy and World War 2. I guess Sci-fi’s been on the back burner. But it will return as I received my 2 boxes of Maelstrom’s Edge models recently.

Anyway, here’s the things I’ve been working on.

Zombie Trolls

These are Mantic’s hefty metal models. They went together fairly well. At first I didn’t like the way I’d painted them, but the scheme grew on me.

Although I try to avoid paying GW prices. The starter sets they just brought out are reasonable value – even better if bought online with a 20% discount. I bought the Seraphon (sorry, Lizardmen!!!) set. Here’s the first 4 Saurus warriors I’ve painted. They’re on homemade bases, made of mdf (with magnets drilled in) and green stuff (and a good Basius mould).

The Lizardmen are going to be a Salamander ally for the Dwarf army I have yet to paint for Kings of War.

Salamanders


And finally, a big mix of World War 2 models.

M26 Pershing

Jeeps

I finally got round to finishing the drivers and gunners for the Jeeps I’d made. Both gunners are magnetised, as are the gunners. It means I can use them as empty looking Transports, or add MMG/HMGs.

Armoured Cars

I bought a platoon of armoured cars from Warlord Games when they released them. I’ve just got round to finishing the paint jobs. They are plastic kits and went together real well – as all plastic Warlord stuff does. I built one as an M8 Greyhound and one as an M20 Scout Car. The 3rd is still intact on sprues awaiting whatever fate I have for it.

M8 Greyhound

M20 Scout Car


US Infantry

I also finished the last 3 US infantry for one of my units. I say finished, but I think I’ll put the same arm badges on as I did to the Jeep above. It will take a while to get round to that though. That’s for Bolt Action, but for Iron Cross, as the units are small blocks of 4-5 Infantry, I made up (about 16, lol) movement trays to make the game quicker. Some 2×2 and some 4×1.

Bases for Iron Cross

And that about sums up the last 6 weeks or so.
Fingers crossed I get the next update out before that long has passed.

Happy New Year!

Happy new year!

Well, maybe a day early, but I doubt I’ll update again before January.

To finish the year off, here’s a pic of the M26 Pershing my wife bought me for my birthday. I had time on Boxing day and the day after to get it complete – although only managed one lousy photo of it on the gaming table – which has a pretty poor energy saving bulb above it 😦

I’ll take a better photo in the light box when I get chance.

US M26 Pershing Heavy Tank:

I’ve also put together the present I received for Christmas (thanks again to my fantastic wife), a Vampire Lord on a Zombie Dragon – this is the main boss for my Undead army.
I did rush to it though, and build it Boxing day and paint it the day after.
It’s still awaiting lighter highlights on the bone work, along with the stone it’s stood on and base painting. I’m waiting to put it on a decent sized piece of mdf, rather than the tabletop sized piece of plastic GW provided with it.

Vampire Lord on Zombie Dragon – work in progress:

Finally today we managed to get a game of Iron Cross in. That’s a really nice simple(ish) set of rules that flows very fast. If Bolt Action is to 40K, then Iron Cross is to Kings of War. Iron Cross does have a fantastic action/reaction system.

Here’s a few pics from the dull lit game table.
Apologies that a few infantry models are only base-coated.
😦

The German Forces:

The US Forces:

Battle photos:

End of Turn 1

End of Turn 2

End of Turn 3

End of Turn 4

End of Turn 5

At the end of turn 6, the US forces (me) failed their break point roll as they’d taken a load of casualties and fled the table.
Iron Cross Game 1: Win to my wife with the Germans

And a couple of other photos I took:

PS: And if you noticed… yeah… Captain America was leading the US forces and Red Skull was leading the Germans. πŸ™‚

Christmas at last

Finally, Christmas is here. I’ve had a few days to slap some colour on a few models – and take some photos of ones I’ve done over the last few weeks.

Bolt Action / Iron Cross

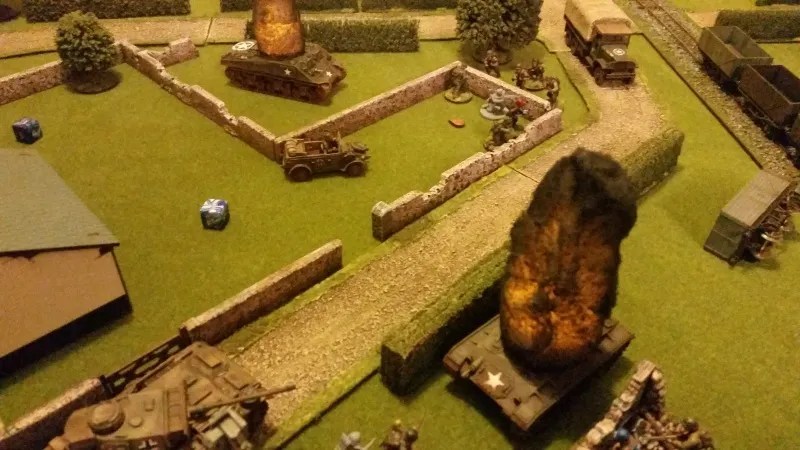
First of all are a few German vehicles I’ve been working on. Although they may not be realistic paint schemes of WW2 vehicles, I do love the way the airbrush with a coat of wash makes the camo colours kind of merge together.

Here’s a StuH42. This was made like the Panzer III with magnets in the track rollers so I could add sideskirts or not for Bolt Action.

The very first tank I bought for Bolt Action was the Panther V. I never dared paint it up till I got the airbrush. Here’s the finished model.

After that, I bought myself a Warlord Games Kubelwagon, Hanomag and a Rubicon Opel Blitz. Without a doubt, the Opel Blitz is the best fitting model I have ever built. I’d recommend it. The only thing I did do which may not show well in the photos is add a clear plastic sheet as the windscreen and on the passenger side, I put in a window half rolled down. I left the driver side window open.

The Warlord Games Kubelwagon was a mix of resin and metal. The resin was fine but the metal is rather delicate and cast badly. There’s so much flash it was hard to tell what was parts and what was detail. I made it so it could be without weapons, or magnetise on the MMG. The MMG strut was so badly damaged, I had to make a kind of padded cloth covered strut to use. The driver is still sitting on the paint table.

The plastic Warlord games Sd.Kfz 251/1 Ausf D Hanomag is also a joy to put together. Very simplistic and designed for gamers to make rather than model makers. I put a magnet under the rear door so the gun can be removed.

And onto the United States Army. I bought myself in the Black Friday sales (along with the German vehicles) a Deuce and a Half truck and a couple of Jeeps.
Both of these are Resin and metal kits. Not all the parts fit well and the metal parts suffer the same as the Kubelwagon – it’s hard to tell parts from flash. I’m hoping Rubicon bring out a US truck soon.
Although the gunner and driver for the Jeep are still on the paint table, the gunner and both the HMG and MMG are magnetic options. The photo has the HMG on.

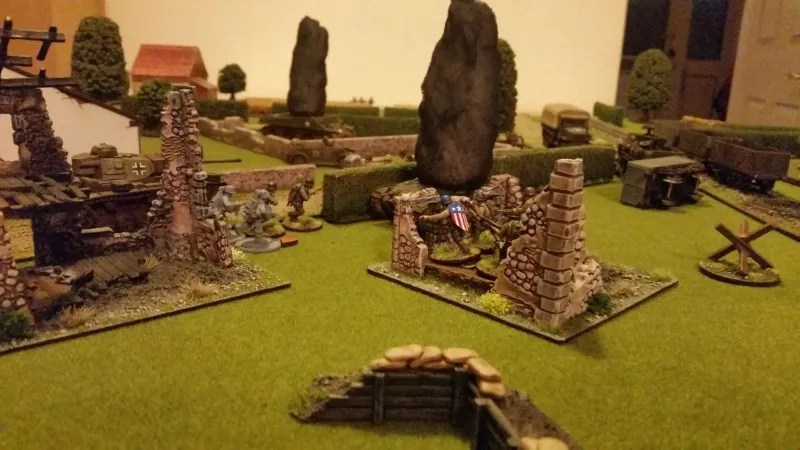
To finish off the World War 2 stuff, I also made up a 4Ground model Piggery/Cartshed and some Czech Hedgehogs. Annoyingly the hedgehogs came in sets of 4 and my large terrain bases have 5 slots, so I made a barbed wire base to go with it.

The Piggery/Cartshed is a real challenge to put together, but it is an awesome model. I tried to take a photo showing the rafters inside the removable roof section. Hopefully you can see the detail it has.

Kings of War

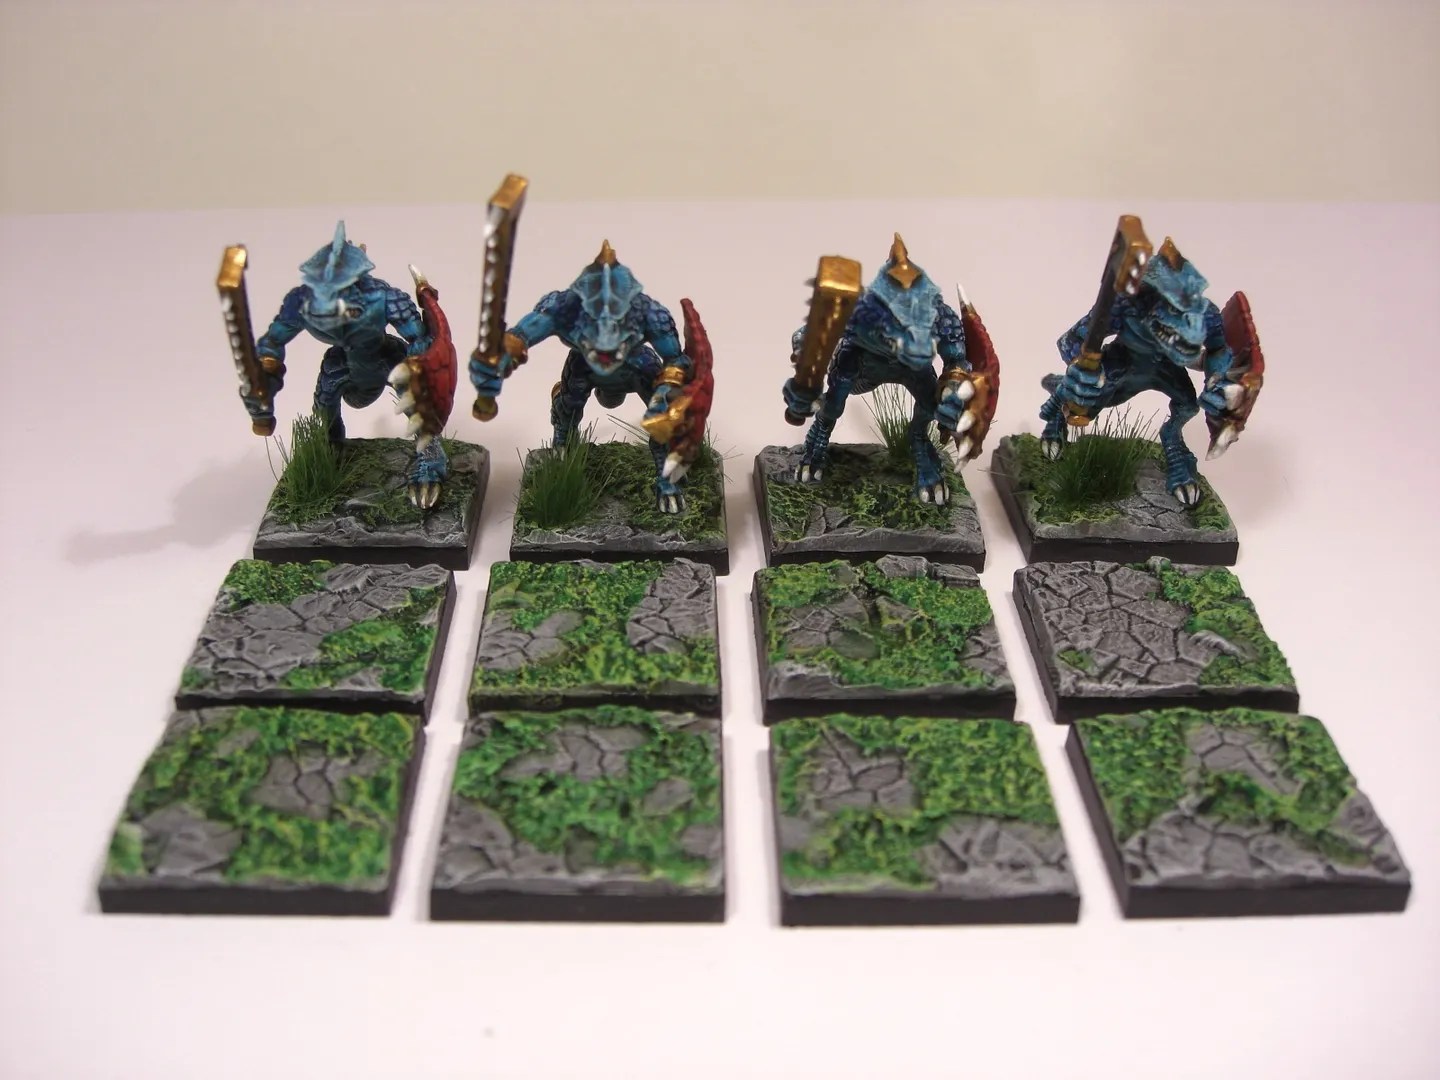
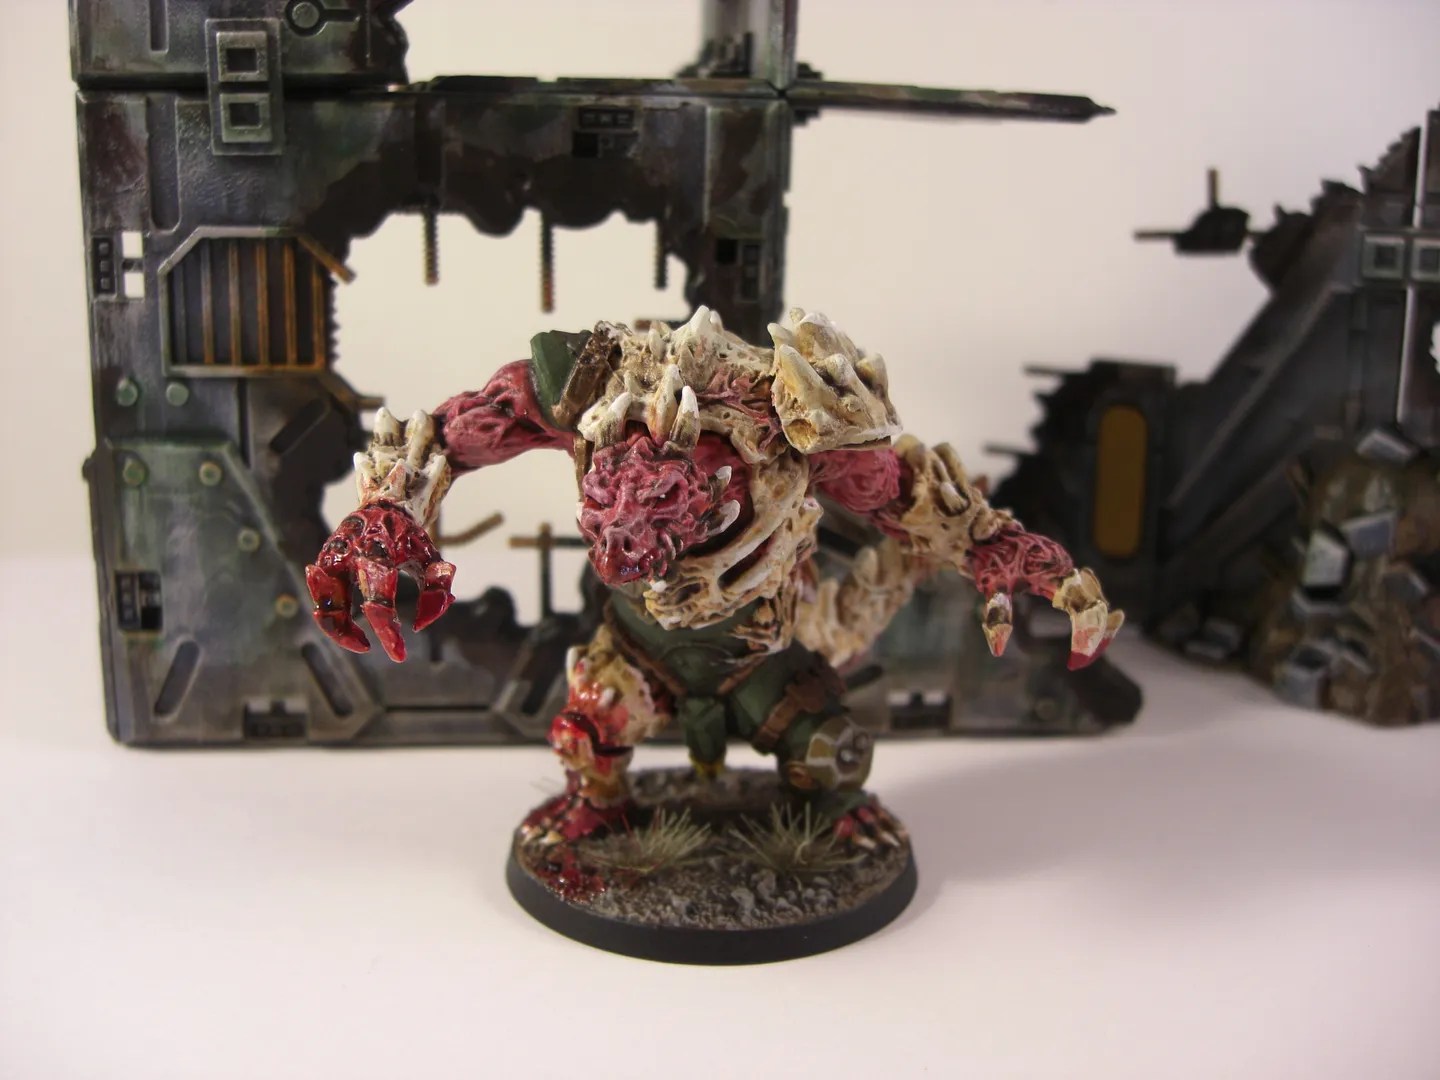
I wanted a unit of 3 Wights that would fit on 40mm bases for the new version of KoW2. The old models I had were very small and only suited 20mm bases.
After much scouring of figure manufacturers online, in the end I decided the best models that fit the job and had the size correct were made for Warmachine – Bane Thralls.
They came in boxes of 10 though, so I made a unit of 3, a unit of 6 and used the boss as a Revenant King. 3 units out of a box isn’t bad I suppose. The models themselves were made of that awful resin/plastic mix the Mantic gamers know as “restic”. I still prefer old fashioned metal or the hard plastic.

Also, I finally got round to taking a photo of the Balefire Catapult I made up. It’s actually an old GW Dwarf Stone Thrower model with the plastic Mantic catapult skeletons. The shield on it matches the shields on one of my skeleton units and also covered a dwarf rune.

Well, that’s it for this update. Hope you all have a fantastic Christmas and a happy new year – and get some time to paint.
πŸ™‚

More from the paint table

I realised my blog has felt neglected lately. Work has been horrendously busy recently and I’ve been putting in 60-70 hours each week. 😦

I have a few projects I’ve finished up recently like the Panther and StuH42 and they need a proper photograph.

I’m currently working on some transports for Bolt Action and have a US Jeep, a US ‘Deuce and a half’, as well as a German 305 Opel Blitz.

The jeep’s been made so the gunner and a choice of MMG or HMG are magnetic options so I can use it as a transport or as a gun vehicle.

The Opel Blitz has custom cut windows in but I’ve not yet added the glass to the Deuce till after I’ve finished spraying.

None of them are finished yet – they need a good coat of mud/weathering.

Here’s a couple of pics from the mobile phone while they’re on the paint table.


Mobile upload

Well, here goes my first attempt at a quick update using my mobile phone.

Having shared a litre of Sangria with my wife and taken on the ridiculous task of painting while drinking and putting up with my son’s choice of film on TV (Pitch Perfect 2 – #sigh) here’s what I achieved.

I airbrush painted 2 German tanks, washed them, waited for them to dry and added decals.

In the light of day tomorrow I’ll fix any horrendous errors I spot and get the weathering done on them.

πŸ™‚

Pic from painting table via mobile phone.

Airbrush trials

Well, I bought myself a cheap airbrush. Having never used or seen one before, it’s a real learning curve. The kit was pretty cheap, under Β£65 for 2 airbrushes, a pump and tank including all the pipes and attachments.

In a usually blokey manner, I couldn’t wait to get started and sprayed up a camo pattern on the Panzer III I’d built a few months ago. I used the exact same colour scheme as I had on the hand-painted Puma I’d done.

I used Halfords khaki basecoat spray, then painted on Vallejo Reflective Green and Vallejo Chocolate Brown for the camo pattern, then a liberal brush wash in Army Painter Strong Ink. A slight drybrush with a desert yellow to edge the armour panels followed by some weathering powders.

Very quick to paint. The difference between the handpainted Puma and the airbrushed Panzer III is enormous. Especially considering the exact same colours were used and I nearly copied the same patterns.

I’ve taken a few pics to compare. The Panzer III has the magnetised shurtzen I built in Playing with Magnets.

Compared to the old hand painted Puma…

And some scenery…

I found a pile of old model Hornby railway stuff in my Mum’s loft when clearing it out. I decided to paint up the track, glue it to boards and add a few wagons which I painted. It will make a nice piece of alternate scenery for games of Bolt Action. All in all I’ve done over 4 and a half foot of track and 4 wagons. That will at least go across a game board.

Where do I start?

It’s been more than a month since I posted anything here… a rather close family bereavement with funerals to arrange (etc) kind of stops Blogs and real life in their tracks.

I have painted a few things during that time, mainly as it was taking my mind off the loss. Most are painted rather rapidly as well so not all my best works.

Here’s a quick photo compilation of things I’ve done.


Deadzone:

Firstly, a bunch of Asterians…

Overseer:

Sky Razor:

Cyphers:

Black Talon:

“Family Photo”:

Then there was some Forgefathers…

Forgeguard:

Iron Ancestor:

“Family Photo”:

And to finish Deadzone painting (for a while) there was a Plague Teraton:

Bolt Action:

I have managed to get a few Bolt Action items painted recently. First of all are some excellent resin scenery pieces from Ironclad Miniatures. They took a matter of 20 minutes each to paint. I’m going to get some more trench pieces when I’ve saved some money up.

I’ve also put together a resin M24 Chaffee – and of course magentised the turrent and HMG weapon – mainly so it can be removed when the vehicle is packed away in it’s case.

And to finish off with, I couldn’t resist getting this piece of scenery (from Games Workshop – argh) to use in Frostgrave.

Phew…

The end of summer

Summer ended and a few projects I had planned are about finished. Now it’s back to work with less time to get any hobby things done.

Here’s the pics and a few notes on what I finished…

Bolt Action

I made a generic modellers field by using a Β£4 coir doormat cut into sections (I still have most of it left). I glued it to some plasticard then glued sand around the edges. A quick basing paint job and I have 2 fields. One is purely rectangular, the other was in an “L” shape.

I also managed to finish off a few Bolt Action figures laying around my desk. A couple of BAR equipped US troops to add to my squads – the plastic set didn’t quite come with enough imo. I also managed a US sniper team with sniper rifles and optional SMGs.

4 more German troops were finished off to add to one of my squads. Here’s all the pics…

Frostgrave

I built a few scenery pieces for this game.

First is the walls built with sponge bricks and lollypop/craft sticks. The sponge bricks were glued together onto the 6 inch craft stick bases. I coated the walls in a disgusting mix of sand/pva/black poster paint. A couple of shades of grey drybrushes later and they’re finished. The snow effect was just the large Army Painter snow tub glued on with pva.

Secondly is the freebie White Dwarf magazine Age of Sigmar model. I have no intention of playing that game (of scale creep and dumbing down of fantasy rules) but it seemed a waste to have a figure with no use. So, now it’s glued onto an old vitamin pill box with an mdf base and turned into a suitable statue for the centre of Frostgrave.

Playing with Magnets

I spent a peaceful day (my wife and lad went on a day out) building a Panzer III I’d bought at the end of July. When I got started, I realised I couldn’t decide whether to build it with the armour skirts or not. So, I dug out the box of magnets and wondered how I’d do it.

The kit itself lent itself to magnetising so well in the end.

The 3 top rollers of the tracks fit a magnet perfectly. I attached magnets (with a combination of green-stuff and superglue) inside the top rollers before I finished off the track pieces. Making sure polarities were all matching so I could attach the armour skirts. I used a double magnet set up for the skirts to try and get the spacing correct.

As you can see in the pictures, the skirts are going to be optional extras incase I want to use an Ausf L with that option, otherwise, without them, you can’t see the magnets are there.

The kit had options for closed hatch or open with commander, so while the magnets were out, they got the same treatment. It means my Panzer III Ausf L can have a closed or open hatch with commander, or as an extra have the armour skirts.

πŸ™‚

Now all I have to do is paint it. 😦

Picture showing positions of magnets before tidying the mess the glue made:

Picture showing it all held together: